
Trusted RFC cab be used to connect with other SAP without password.
To connect one SAP system with another SAP system without password, calling SAP system is known to the called system as a trusted system.

Now create authorization role to access XYZ system. this should be created in XYZ system.

Generate profile.

Once profile generated change authorization data.

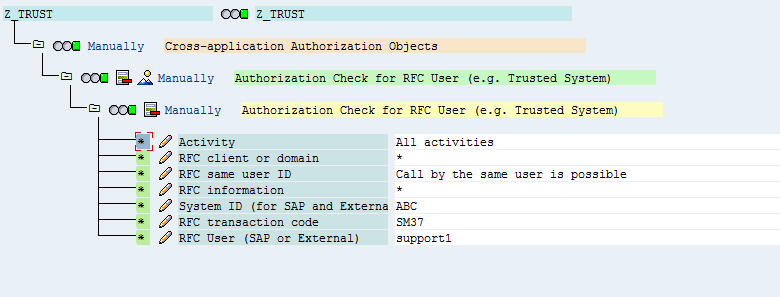
Add authorization object S_RFCACL manually


Now mention from which system and user connection should accept. Then save and generate profile.

Then add your user to role and do user comparison.


Now go to smt1 transaction XYZ system and create trusted connection.

Now mention RFC destination which you created in first step.

Once RFC destination provided it will login to ABC system and create trusted relationship from ABC to XYZ. Here you can also mention validity period so that connection will be valid till particular time.

Now login to ABC system with same user as we added role in XYZ system.
Go to smt2 transaction and test the connection by double clicking on connection.
mention transaction to which it should go.

Now it will go to XYZ system to that particular transaction.

To connect one SAP system with another SAP system without password, calling SAP system is known to the called system as a trusted system.
The calling SAP system must be registered with the called SAP system as a trusted system. The called system is called the trusting system.
Step by step procedure to create trusted RFC with screen shots:
Now we will establish trusted connection from ABC system to XYZ system
Here ABC is trusted system and XYZ is trusting system.
Now create normal RFC connection to ABC in XYZ system.

Now create authorization role to access XYZ system. this should be created in XYZ system.

Generate profile.

Once profile generated change authorization data.

Add authorization object S_RFCACL manually


Now mention from which system and user connection should accept. Then save and generate profile.
Then add your user to role and do user comparison.


Now go to smt1 transaction XYZ system and create trusted connection.

Now mention RFC destination which you created in first step.

Once RFC destination provided it will login to ABC system and create trusted relationship from ABC to XYZ. Here you can also mention validity period so that connection will be valid till particular time.

Now login to ABC system with same user as we added role in XYZ system.
Go to smt2 transaction and test the connection by double clicking on connection.
mention transaction to which it should go.

Now it will go to XYZ system to that particular transaction.


